Showing posts with label oil painting. Show all posts

Saturday, December 12, 2015

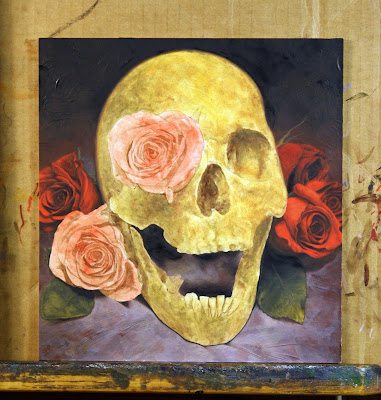
"Oculus Rosa"

Wow! It's been a ridiculously long while since I posted anything. In fact the last time I did a blog post was when I moved from Massachusetts to KY back in 2013. I've spent the last two years doing freelance illustration, a little video game concept work and painting commissions. I've been reacquainting myself with surroundings and my family and friends. 

A couple of months ago I was somewhat depressed about the way my career has been going. I've moved back to KY, now, for the third time in my life. I always find it difficult to make my career work here. Usually I end up finding a job and having to move to where that job is.  I was contemplating my options when I saw a Facebook post from a tattoo shop here in the town I live in. The owner posted that they were looking to add an artist to their shop and were willing to train. I responded with an introduction and link to my website. After a conversation or two we had a face to face and I'm now apprenticing to be a tattooist at Ink Well Tattoo in La Grange, KY under Scot Winskye. I've begun a new 10,000 hour journey. It's exciting, I'm having a great time and I have a lot to learn.
 
Photo by Anmarie, victim #1
Ink Well Tattoo, La Grange, KY
I decided to paint a small painting to bring in some Christmas cash and regarding subject matter I decided to stay within the tattoo mindset I'd been in. A simple skull and roses painting. As with some previous paintings I also used the limited "Zorn Palette" of lamp black, cadmium red, yellow ochre and white.

1.) First was the drawing in simple line form to be transferred to a piece of gessoed illustration board, 8 x 8.5. I added a small amount of texture to the board with acrylic gel medium.

2.) The drawing along with a thin wash to get rid of the white of the illustration board.

3.) For establishing the darks I broke from the limited palette and used burnt umber. It's what I'm accustomed to using and stuck with it.

4.) I blocked in a thin coat of the local colors.
 
5.) I painted the background, which was mostly black with a little color as it got closer to the roses. I then painted the four roses that were actually behind the skull.
 
 
6.) Next I painted the leaves and foreground.
 
7.) First I decided that the foreground seemed a little too cool and a little too clean so I hit it with some warm washes and a little spatter to dirty it up. Next I painted the skull itself. I made use of the texture that I put down on the board and kept my brushwork a little scrubby. The highlights were put on after the darks and mid tones dried.
 
 
8.) Finally there was only the last two roses that were in front of the skull. As it turns out I enjoy painting the roses red.

 
9.) The final high resolution scan. "Oculus Rosa" 2015, oil on illustration board, 8 x 8.5. The painting quickly found a home. Thank you Sarah.


Saturday, June 29, 2013

"Grouchy Bastard" a self portrait.

I have a very busy mind. I'm plagued with chronic, looping introspection. It makes it difficult to sleep at night and when I'm at the easel it's sometimes maddening. I think about things like growing older, mortality, regret, love, hate, loss.. avenging my enemies.. I wondered if painting a self portrait would convey any of that ridiculousness.

 
I painted this piece with the limited "Zorn Palette" of Ivory Black, Yellow Ochre, Cadmium Red Light and Permalba White. My hair is black and my facial hair is black and silver. I wore a black shirt and put up a gray sheet for my backdrop. This way everything would be very neutral colors except for the skin tones. I used a single light source. Kudos to my son Zach for taking the reference shots. Awesome job!
 
 
I tried to keep the composition simple. I wanted the positive and negative space to loosely balance out. I generally try to stay away from ever centering a person in a canvas. Off center is always more interesting. I backed the figure up and to the right. This way the person isn't looking directly outside of the painting but rather looking into the painting.

 
On a scrap piece of canvas stapled to a piece of plywood, I taped off a 9.5 x 12 area and transferred my drawing down and sealed it with fixative. I took the four colors on my palette and mixed them until I had a color that did not lean toward red or ochre and who's value was somewhere around a 50%. Just a nice neutral, nothing color to put down on the canvas as a simple wash.

 
If I wanted to be a true-ist regarding my color scheme I would have established my darks with black or a black/red/ochre mix. Out of habit I reached for the tube of burnt umber. I'd already laid down a few washes before I realized it. Oops! I think it'll be ok.

 
I didn't want to spent very much time on the background. I allowed paint to drip and threw some spatters in for good measure. As usual I work from background to foreground. I spent a little more time on the shirt than I did with the background. Not a lot more time, however. I wanted most of my detail and energy to go into painting the face. I tried to keep the edges relatively soft. and the further I got away from the face, the softer the edges became.


When I paint a face I generally start with the eyes. Once I've painted the eyes, I can see life in the face. It begins to be a person to me rather than pigment on canvas. The lenses of the glasses are, of course, clear. Earlier when I painted the background I painted the lens on the left because it was made up of the background colors. The lens on the right was comprised of the colors of the face. depending on how strong a persons glasses are there is a certain amount of distortion of what is behind the glasses. My glasses aren't overly strong so the distortion level was minimal. The edges of the lenses are probably the hardest edges in the painting.

 
The facial hair and the noggin hair were next. I threw down a mid tone, indicated the darks and then hit it with the lights. The very last thing I painted was the arm of the glasses. I do use a ruler for striking straight lines. A tricky little technique taught to me by my first year teacher at Central Academy of Commercial Art, Mike McGuire.
 
The signature is last and it's done!
 
 
Thanks to Mark Thompson for helping me with the video.
 
 
Cheers!